
Interrupts and Cross-References
To continue wiring between two sheets, use 中断点 (interrupts); when one device's coil and contacts are scattered across several places, use cross-references to point between them. Both belong to Pro's expressiveness: the free version still draws the symbols and wires, but generates no reference labels.
Interrupts
- Click 中断点源 (Interrupt Source, or press I) in the toolbar at the drop point on the current page, then use 中断点目标 (Interrupt Target, ⇧I) to place the paired symbol on another page (you can also pick the same symbol from the 跨页中断点 (Cross-page interrupts) category in the symbol library).
- Select the interrupt and fill in 网络名 (Network name) in the panel's 跨页中断点 (Cross-page Interrupt) group. Source and target pair up as soon as their names match, no matter which pages they sit on.
- All interrupt pins sharing a name merge into one potential network: L1 on page A and L1 on page B are therefore the same "electricity" — which is also why they share one wire number under numbering by potential network.
- Once paired, the panel shows 配对位置:页名 · 分区 B3 (Pair location: page name · zone B3) with a 跳转到配对中断点 (Jump to Paired Interrupt) button; when unpaired it shows 暂无配对中断点(需同名源/目标成对出现) (No paired interrupt yet — a source/target pair with the same name is required). Double-clicking an interrupt jumps the same way; the hover tooltip reads "源 中断点 X · 配对: 页名 分区 B3" (Source interrupt X · Paired: page name, zone B3) or "· 未配对" (· Unpaired).
Warning
Electrical Rules Check reports 中断点未设置网络名称
(Interrupt has no network name set) and 中断点「X」缺少配对的目标/源
(Interrupt "X" is missing its paired target/source) when the name is left empty or only one side exists.
The customary practice: the source carries the direction (e.g. QP1), the target carries the same name;
put one source per page and collect the targets on the destination page.
Cross-References
When a device record holds both a coil and contacts (achieved by 关联到已有设备, "associate with an existing device"), EletraDraw automatically generates two-way references:
- The coil is annotated with each contact's location and the contacts with the coil's; the label format is "触点 图号-分区" (Contact sheet-no-zone) or "线圈 图号-分区" (Coil sheet-no-zone), where the sheet number comes from the drawing-number field of the title block.
- The panel's 交叉引用 (Cross-References) group lists every target ("contact/coil + page name · zone"); when there are none it prompts 暂无关联触点。将触点关联到同一设备后自动生成。 (No associated contacts yet. They are generated automatically once contacts are linked to the same device.)
- Clicking the reference text or double-clicking the coil/contact jumps to the referenced instance; the hover tooltip lists entries like "触点 → 页名 · 分区 X" (Contact → page name · zone X).
- The device code and its reference lines are combined into one label block and placed together.
Tip
Cross-reference labels on the canvas, the panel's cross-references group, and the reference text in PDF/PNG/SVG all appear only in the Pro version; in the free version these places show the 交叉引用(Pro) (Cross-References (Pro)) explainer. DXF and VSDX exports always include the reference text (both formats are already Pro features).
Automatic Label Layout and Manual Nudges
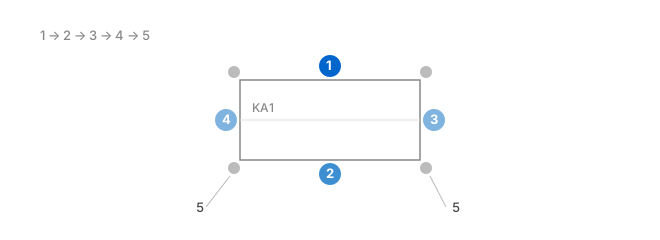
- Avoided objects include wires, components, text annotations, wire numbers, potential names, junctions, and the title-block area; wire routing does not treat labels as obstacles.
- Label positions are recomputed only after path adjustments finish, so labels don't jump around while you drag.
- Dragging a label directly remembers where you put it (saved per page), and it stays there when the document is reopened; the same position preference follows the component when it moves.
- To hand it back to the program: double-click the label, or right-click and choose 恢复标签自动布局 (Restore Label Auto Layout).